

I don’t decorate.
Part of it relates to my utter lack of artistic ability, and part of it stems from my philosophy that food is there to taste good, not look pretty. Many people are capable of doing both, but I’d rather focus on the thing I can actually do. What really perplexes me is when presentation seems to take precedence over taste, which I imagine is how fondant came into being.
But if I’m baking something for someone else, I feel a need to at least try. In this case, I got a little ambitious.

Every year on my boyfriend’s birthday, I bake him a berry pie. Usually, the only decoration is the five notches I put in the center of the crust–they serve the purpose of ventilation, of course, but I like to think a little artistry goes into choosing the pattern of the notches. But after reading a Buzzfeed post wherein two pie bakers demonstrated some interesting decorating techniques, I decided to attempt the braided lattice. And, well. I tried.
For the crust I went with my go-to recipe, the all-butter pie crust recipe from Smitten Kitchen, which I highly recommend. The crust is always buttery, flavorful, and, if you take care to keep the dough cold (read: if you don’t spend half an hour in a hot kitchen trying to braid dough like a weirdo), flaky.
As for the filling: you’d think that if this is something I make at least once per year, I’d have settled on a recipe by now. But that would be far too convenient. Instead, I did what I seem to do every year and cobbled together a Frankenrecipe after looking at several different recipes. This year’s contributors were this, this, this, and this. The Franken approach mostly worked, though I know now to use more sugar (this was one of the rare occasions when using less sugar than a recipe calls for actually backfired on me). I’ve adjusted the amount of sugar accordingly in the recipe below.

This pie is delicious. The blackberries take center stage, with the sugar enhancing their flavor without smothering the blackberries’ natural tartness. The buttery pie crust–my favorite part of any pie–makes it truly decadent. My favorite part is when the crust that touches the filling gets a little soft as the berries’ juices bake right into it. And the vanilla ice cream (non-negotiable in my book) gets all melty and swirls with the berry filling, and when you get a bite of everything at once it’s magical.
Now, the braiding.
After rolling out the dough for the top crust, use a pizza cutter or sharp knife to cut off any jagged ends so that you are left with a large square. Then cut the square into thick strips, about half an inch in width (this was my error–I made some of my strips too thin). Place three strips next to each other and use your fingers to squish the top 1/2 inch of the strips together.
Seriously, look at the disparity in strip sizes. It’s like I was drunk.

Then begin braiding by putting the leftmost strip into the middle, then putting the rightmost strip into the middle, then the leftmost, and so forth. I’m sure you all know how to braid, but when faced with the strips, I forgot how braiding works. I spent about five minutes moving and unmoving the strips in different directions and wondering what braiding even was. But I remembered eventually and that’s what counts.
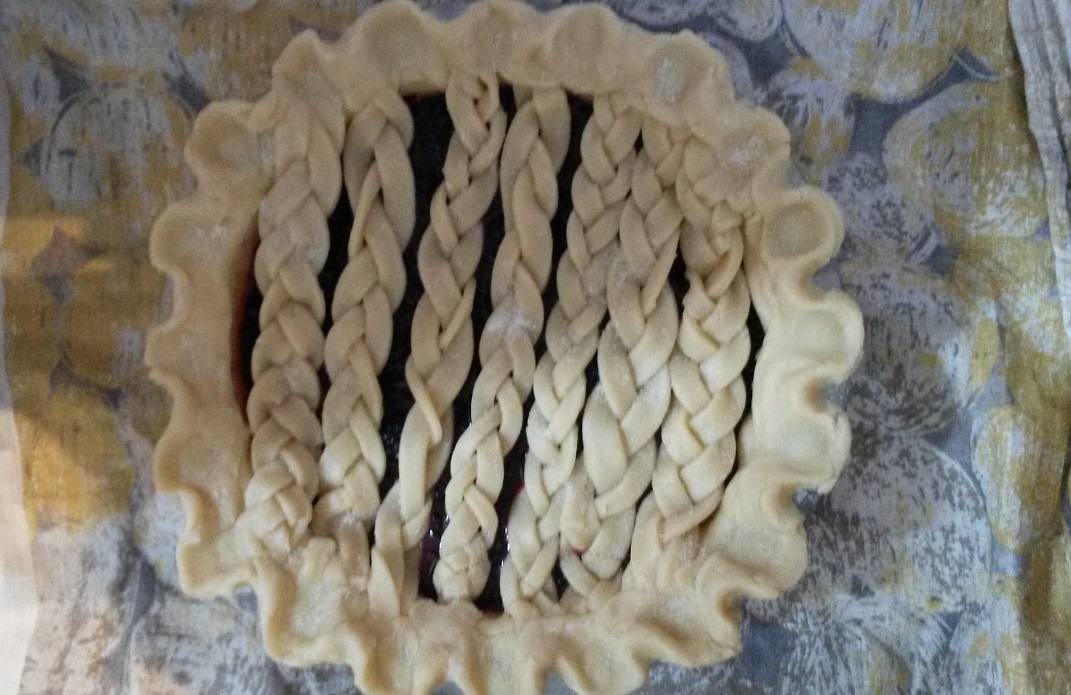
Anyway, it was ridiculous. My strips were too thin, and sometimes they would break off and I’d have to coax them to rejoin the group and the oven was fully preheated because braiding was taking longer than I thought and the kitchen was stifling and sweat was rolling down my back and it was gross.
As the pie baked, the blackberry juices bubbled over some of the braids, which didn’t help with aesthetics… but berry-soaked crust is delicious and it was well worth the slight eyesore it caused. Which is my whole philosophy anyway, if you’ll recall, so luckily my attempt at decoration didn’t ruin things too much.

(Seriously. Ice cream. Do it.)
Blackberry Pie with a Braided Crust
Makes one 9″-9.5″ pie
Butter Crust
Source: Smitten Kitchen
- 2 1/2 cups flour
- 1 tbsp sugar (I say 2 tbsp. Do it)
- 1 tsp salt
- 2 sticks butter, cold
- 1 cup ice water
Combine the flour, sugar and salt in a large bowl. Cut the butter into cubes (if you’re civilized) or rip it apart with your fingers (if you’re me) and incorporate the butter pieces into the flour mixture, working them in until the butter bits are pea-sized. Add the ice water slowly and stir with a spoon. Stop adding water when you’ve reached a workable dough.
Divide the dough into two circular mounds. Flatten them slightly and wrap them in plastic wrap. Let chill in the refrigerator for at least half an hour (okay, 1-2 hours according to the source recipe, but I prefer to be impatient). At this point, start your filling.
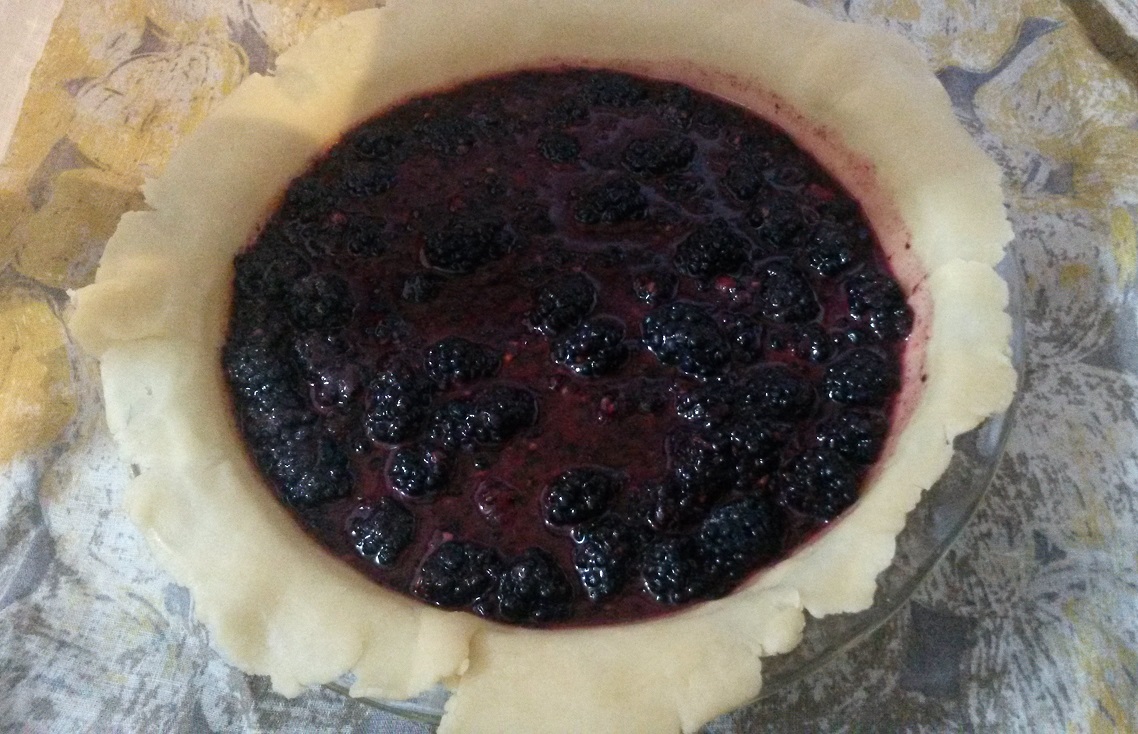
Blackberry Filling
- 4 pints blackberries (about 2.5 pounds)
- 1 1/2 cups sugar
- Zest and juice of 1/2 a lemon
- 1/4 cup cornstarch
Combine all ingredients in a bowl and let sit for twenty minutes. Use a spoon to mash some of the blackberries. That’ll show ’em.
When ready, roll out the pie dough (lots of excellent techniques here) for the bottom crust and put it in the pie plate (leave the excess dough around the edges if you’re going to do the braiding thing. If not, trim away). Add your filling (we’re getting to that) and then roll out the dough for the top crust. You can put it directly on top of the filling and trim to perfection or, if you’re up for a challenge, you can braid the top crust once you’ve rolled it out.
To braid: Use a pizza cutter or sharp knife to cut off any jagged ends so that you are left with a large square. Then cut the square into thick strips, about 1/2 inches wide. Place three strips next to each other and use your fingers to squish the top 1/2 inch of the strips together. Then begin braiding by putting the leftmost strip into the middle, then putting the rightmost strip into the middle, then the leftmost, and so forth. Repeat this process with additional sets of three strips until you have enough braids to cover the pie. Lie them across the pie going in one direction. Fold the overhang from the bottom crust around the edges of the braids and gently press them together to integrate them. Then trim or flute the edges as you see fit.
Preheat the oven to 400 degrees (or maybe do this earlier. I’m just trying to save you the awfulness of braiding crust while the oven blasts heat at you). Bake the pie for 15 minutes, then lower the oven’s temperature to 375. Bake for another 30-45 minutes, or until the filling is bubbly, reduced, and thickened–if you’re not sure, use a knife or toothpick to poke at the filling and get a sense of how much it’s reduced. If the pie’s edges start to look too brown, loosely cover them with tin foil–or, if you’ve reached your wit’s end with trying to arrange four separate pieces of foil around a pie so that they somehow cover the crust without jostling one other, use the pie shield you just bought to cover the pie’s edges. Remove from the oven and let cool a vaguely reasonable amount of time before cutting yourself a slice and topping it with vanilla ice cream.
